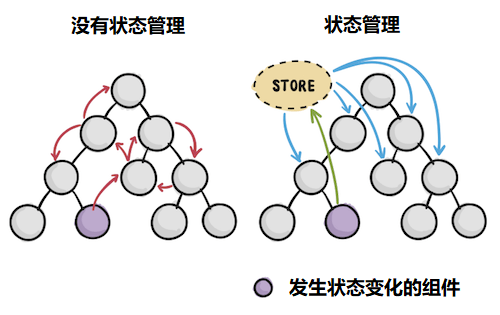
集中式状态管理工具

起源
2014年 Facebook 提出了 Flux 架构的概念,采用 单向数据流 思想。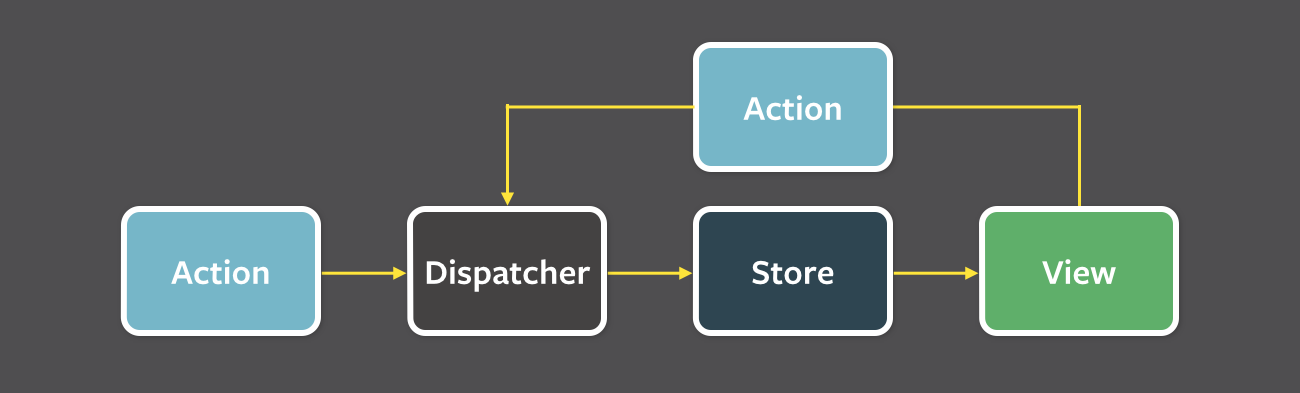
2015年,Redux 出现,`,很短时间内就成为了最热门的状态管理架构。
Redux 概述
yarn add redux
Redux 是 JavaScript 应用的可预测状态容器,用来集中管理状态。
特点:集中管理、可预测、易于测试、易于调试、强大的中间件机制满足你所有需求。 注意:redux 是一个独立于 react 的库,可以配合任何 UI 库/框架来使用。
redux的三大原则
单一数据源
State是只读的
使用纯函数来执行修改
什么情况下需要使用redux
总体原则: 大型项目状态管理复杂才用
某个组件的状态,需要共享
某个状态需要在任何地方都可以拿到
一个组件需要改变全局状态
一个组件需要改变另一个组件的状态
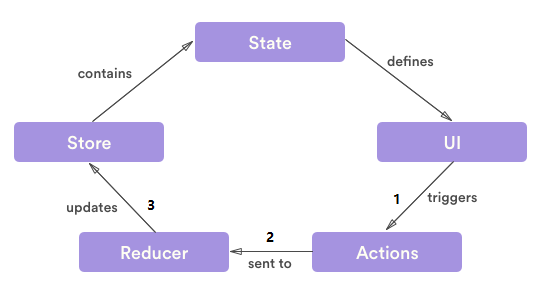
三个核心概念
计数器案例:点击 +1 按钮,数值加1(React 关注 UI,Redux 关注 state)。
计数器案例的 state: { count: 0 } 。
- Action(“砖”家):描述要执行的行为动作,比如要让计数器的值加1(提出想法)。
- Reducer(劳动者):接收 Action 完成该动作,比如完成值加1得到新状态 { count: 1 }(实现想法)。
- Store(管理者):是 Action 和 Reducer 的桥梁,将 Action 传递给 Reducer。
action
- action 是一个原生 JavaScript 对象。
- 作用:描述要执行的行为动作,提供完成该动作需要的数据。比如:计数器案例 +1 就是一个动作
- 约定1:必须提供 type 属性,用于描述动作类型。
- 约定2:type 属性的值是字符串,约定使用全大写字母。
- 约定3:可以提供其他属性,提供完成该动作需要的数据。
- 简化操作:使用函数来创建 action,将该函数叫做 action creator。
js
{ type: 'INCREMENT', }

// todo app,添加任务的action:
{ type: 'ADD_TODO', text: '学习Redux' }
js
// action creator:
const increment = () => ({ type: 'INCREMENT' })
// 创建action
increment()
reducer
- reducer 是一个函数。
- 作用:接收 action 和 state(初始 state), 完成该行为动作,并返回新 state。
- 代码解释:(state, action) => newState。
- 约定:不要直接修改 state,而是,根据当前 state 得到新的 state。
- 注意:reducer 应该是一个纯函数(同样的输入,必定得到同样的输出),不要有修改参数、调用 Math.random() 等不纯的操作。
js
const counter = (state, action) => {
  switch (action.type) {
    case 'INCREMENT':
      return state + 1 // state++ 表示直接修改当前 state
    default:           // 必须得有!默认返回当前 state
      return state
  }
}
store
- Redux 的 state 仓库。一个 redux 应用只有一个 store。
- 作用:将 action 和 reducer 组合到一起。
- 职责:
- 1 提供整个应用的 state
- 2 提供 dispatch 方法,用来触发 action
- 3 提供 getState 方法,用来获取整个应用的 state
- 4 提供 subscribe 方法,监听 state 变化。
js
import { createStore } from 'redux'
import counter from './reducer'
// 接收 reducer 作为参数,创建 store
const store = createStore(counter)
js
store.getState() // 获取state
store.dispatch({}) // 触发 action
const unsubscribe = store.subscribe(() => {}) // 监听 state 变化
//调用unsubscribe()取消监听state变化
redux的基本使用
js
// 1.安装
 yarn add redux
// 2.在js文件中从redex包里面导入createStore函数
import { createStore } from 'redux'
//3. 创建store,将reducer传入到store中
const store = createStore(reducer)
// 4. 定义redecer函数
//	要接收两个参数: state, action
//  注意:在定义reducer的时候,通过es6语法设置默认值的方式,初始化state的值
function reducer(state = 0, action) {
  switch (action.type) {
    case 'INCREMENT':
      return state + 1
    default:
      return state //一定要写一个默认情况,返回原来的state
  }
}
// 调用subscribe,监听state的变化 注意: 要在dispatch之前调用
store.subscribe(() => {
  console.log(store.getState())
})

//console.log(store.getState()) //获取store中state的状态值
store.dispatch({ type: 'INCREMENT' }) // 分发action
store.dispatch({ type: 'INCREMENT' }) // 分发action
//console.log(store.getState())
redux的内部执行原理
js
// 创建store的时候,会自动调用一次reducer函数
const store = createStore(reducer)
// redux内部会创建一个action {type: "@@redux/INIT8.v.s.i.j.j"}
// 目的是让reducer中执行默认的返回值,从而拿到state的初始化值
function reducer(state = 0, action) {
  switch (action.type) {
    case 'INCREMENT':
      return  state + 1
    default:
      return state //一定要写一个默认情况,返回原来的state
  }
}


store.dispatch({ type: 'INCREMENT' }) //这次分发action,reducer中拿到的state 0
store.dispatch({ type: 'INCREMENT' }) // 这次分发action,reducer中拿到的state 1
//console.log(store.getState())
react-redux
- Redux 只能用来管理应用的 state。
- 如果要配合 react 使用,需要借助 react-redux 这个绑定库。


核心API
- Provider 组件:用来包裹整个 React 应用,接收 store 属性,为应用提供 state 和 操作 state 的方法。
- connect 函数:连接 Redux 和 React 组件,为被包裹的组件提供 state 和 操作 state 的方法。 组件中通过 props 获取 Redux store 的内容。
js
import { Provider } from 'react-redux'
<Provider store={store}>
  <App />
</Provider>
js
connect()(Counter)
// mapStateToProps 函数:提供组件用到的state,作为组件的props,传递给 Counter 组件
// mapDispatchToProps 函数:提供组件用到的操作state的方法,作为组件的props ,传递给 Counter 组件
//注意: 这两个参数是函数,一定要有返回值(返回值是对象)并且都是可选的(可以不传)
connect(mapStateToProps, mapDispatchToProps)(Counter)
使用步骤
- 1 安装:
yarn add react-redux。 - 2 导入 Provider 组件。
- 3 使用 Provider 组件,作为 React 应用的根组件,包裹整个应用。
- 4 将 redux 的 store 作为 Provider 组件 store 属性的值。
- 5 导入 connect 函数(将 React 组件 和 Redux store 链接在一起)。
- 6 使用 connect 函数,包装 React 组件。
- 7 在 React 组件中,通过 props 获取到 Redux store 中的state。
js
//导入provider和connect
import { Provider, connect } from 'react-redux'

// 定义的函数组件
function Counter(props) {
  console.log(props) //默认可以获取到dispatch方法
  return (
    <div>
      <div>{props.count}</div>
      <button onClick={() => props.onincrement()}>+1</button>
    </div>
  )
}
//使用connect包装Counter组件
const WithCounter = connect(
  mapState,
  mapDispatch
)(Counter)

//connect要用的第一个参数
// state是redux中的state
const mapState = state => {
  return {
      // 这里return的内容就是react组件中props接收到的数据
    count: state
  }
}
//connect要用的第二个参数
//dispatch 是redux中的dispath
const mapDispatch = dispatch => {
  return {
       // 这里return的内容就是react组件中props接收到的数据
    onincrement() {
      dispatch({ type: 'INCREMENT' })
    }
  }
}
//最终使用包装后的组件
ReactDOM.render(
  <Provider store={store}>
    <WithCounter></WithCounter>
  </Provider>,
  document.getElementById('root')
)
react-redux 简写形式
javascript
// loading和getUserDataAsync 是连个actionCeater函数
import {
  loading,
  getUserDataAsync
} from './redux/actions'

// 基础写法:
let mapStateToProps = state => {
  // console.log(state)
  return {
    ...state
  }
}
let mapDisPatchToProps = dispatch => {
  return {
    loading: () => {
      dispatch(loading())
    },
    getUserDataAsync: searchname => {
      dispatch(getUserDataAsync(searchname))
    }
  }
}
connect(
 mapStateToProps,
 mapDisPatchToProps
)(UI组件)
// 简写形式:
// 上面的方式可以简写成下面这种方式:
connect(
  state => ({ ...state }),
  { loading, getUserDataAsync }
)(UI组件)
两种类型的组件
- 展示组件(UI组件)
- 可以理解为: 不跟 redux 关联的组件(要传入connect() 中的组件 )
- 特点: 提供了组件的结构和样式
js
<Todo />- 容器组件
- 可以理解为: 跟 redux 密切关联的组件( 调用 connect() 之后得到的组件 )
- 特点: 专门与 redux 进行交互
js
// 容器组件
// withTodo 就是容器组件
const withTodo = connect()(Todo)
redux-thunk 使用
1. 安装:yarn add redux-thunk
2. 导入thunk    import thunk from 'redux-thunk'
3. 导入redux中的一个函数:`applyMiddleware`
4. 将redux-thunk中间件,作为参数传递给 applyMiddleware
5. 将 middlewares 传递给 createStore,作为它的第三个参数
js
import thunk from 'redux-thunk'

// 注意: logger 中间件应该放在后面
createStore(reducer,applyMiddleware(thunk,中间件,中间件))- 注意:redux-thunk对 action 做了处理,异步操作就是放在action中被处理的!!!
js
// 同步的action
const increment = () => {
   return { type: 'INCREMENT' }
}
//异步的action  --要求返回一个函数,这个函数可以拿到dispatch
const incrementAsync = () => {
    //thunk会处理这个函数,将dispatch传入到函数中
  return function(dispatch) {
    setTimeout(() => {
        dispatch({ type: 'INCREMENT' })
    }, 2000)
  }
}
注意: 标准的异步请求应该有三个状态, 1.等待 2.成功 3.失败
chrome的redux插件
js
// 1. 单独使用 redux 浏览器插件:
const store = createStore(
  reducer,
  initialState,
  // 单独使用 redux 浏览器插件
  window.__REDUX_DEVTOOLS_EXTENSION__ && window.__REDUX_DEVTOOLS_EXTENSION__()
)

// 2. 和中间件配合使用

yarn add redux-devtools-extension -D

import { composeWithDevTools } from 'redux-devtools-extension'

createStore(reducer, initialState, composeWithDevTools(applyMiddleWare(logger)))
combineReducers
- redux 中提供的一个 API
- 作用:
- 1 用来将多个 reducer 合并为一个 根reducer
- 2 会影响 redux 中的状态值
- 有了这个方法之后,将来 redux 中就可以有任意多个 reducer,这样,每个 reducer 只需要处理某个特定的状态即可。
- 注意:每个 reducer 中的状态最终被全部合并到一个对象中。对象中的键就是参数对象的键
js
import { createStore, combineReducers} from 'redux'
const rootReducer = combineReducers({
  todos: reducer,
  filter:filter
})

const store = createStore( rootReducer )

store.getState() // 初始状态: { todos: [], filter: 'all' }
js
// 此时的应用的状态为:{ todos: [], filter: 'all' }
const rootReducer = combineReducers({
  todos: reducer,
  filter
})

// 该写法等价于上述combineReducers调用:
function rootReducer(state = {}, action) {
  return {
    todos: reducer(state.todos, action),
    filter: filter(state.filter, action)
  }
}

// 当我们使用 dispatch( 动作 ) 分发了一个动作的时候, redux 中所有的 reducer 全部都会执行一次
// 因为 redux 无法知道到底是哪个reducer来处理该状态,所以,所有的 reducer 全部都会被重新执行一次